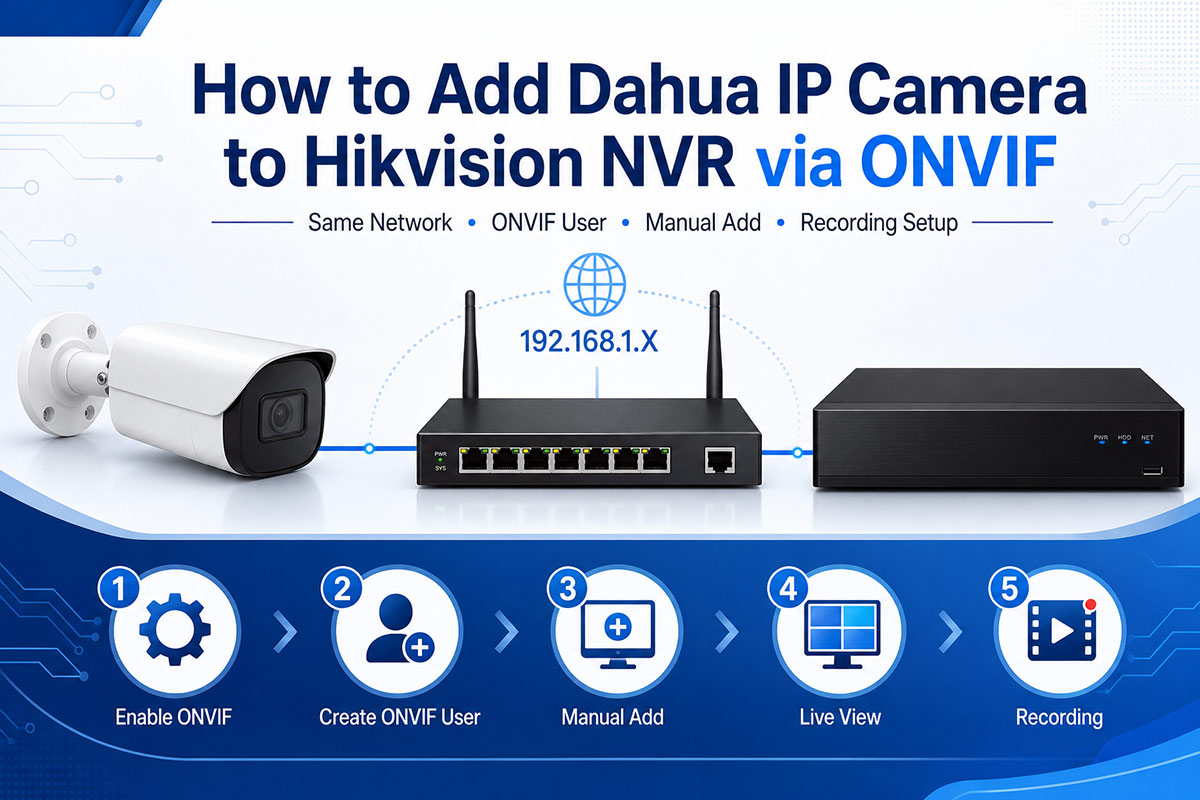

Quick Answer: Add Dahua IP Camera to Hikvision NVR via ONVIF
Yes, a Dahua IP camera can usually be added to a Hikvision NVR through ONVIF, as long as both devices support ONVIF, use the same network segment, and the correct ONVIF username, password, IP address, and port are entered manually.
The basic process is simple:
-
Connect the Dahua IP camera and Hikvision NVR to the same network.
-
Enable ONVIF on the Dahua camera.
-
Create an ONVIF user on the Dahua camera.
-
Manually add the camera to the Hikvision NVR using ONVIF protocol.
-
Check live view.
-
Enable recording schedule.
-
Troubleshoot offline issues if needed.
For installers, system integrators, and project buyers, ONVIF is one of the most useful ways to connect different brands of IP cameras and NVRs in one CCTV system.
What Is ONVIF for Dahua IP Camera and Hikvision NVR Compatibility?
ONVIF is an open industry standard designed to improve interoperability between IP-based security devices from different manufacturers. In CCTV projects, ONVIF allows a Dahua IP camera, Bokysee IP camera, or other third-party ONVIF camera to communicate with a Hikvision NVR.
For basic video surveillance, ONVIF Profile S is especially important. ONVIF explains that Profile S is designed for IP-based video systems, allowing an IP camera or video encoder to send video data over an IP network to a client such as an NVR or video management software.
However, ONVIF compatibility does not always mean full feature compatibility. Basic live view and recording usually work. But advanced smart features, such as AI human detection, face capture, line crossing detection, vehicle detection, smart playback, and two-way audio, may be limited or unavailable when connecting across different brands.
For more preparation before project installation, you can also read Bokysee’s internal guide: ONVIF IP camera compatibility checklist.
Before You Add Dahua IP Camera to Hikvision NVR: Network Checklist
Before adding the camera, prepare the following information:
|
Item |
Example |
|---|---|
|
Dahua camera IP address |
192.168.1.120 |
|
Hikvision NVR IP address |
192.168.1.64 |
|
Gateway |
192.168.1.1 |
|
Subnet mask |
255.255.255.0 |
|
ONVIF username |
onvif |
|
ONVIF password |
Your password |
|
ONVIF/HTTP port |
Usually 80 |
|
RTSP port |
Usually 554 |
|
Protocol |
ONVIF |
The Dahua IP camera and Hikvision NVR should be in the same network segment. For example, if the Hikvision NVR is 192.168.1.64, the Dahua IP camera can be set as 192.168.1.120.
If the camera and NVR are not in the same IP range, the NVR may show the camera as offline or network abnormal. Hikvision support explains that a “Network Abnormal” status can happen when the recorder cannot connect to the device IP address, often because the device has a different IP address than the recorder is looking for or is connected to the wrong network side.
[Image suggestion 2: Screenshot-style image showing IP address table: NVR 192.168.1.64, camera 192.168.1.120, gateway 192.168.1.1.]
Alt text: Dahua camera and Hikvision NVR IP address settings for ONVIF connection.
Step 1: Enable ONVIF on Dahua IP Camera
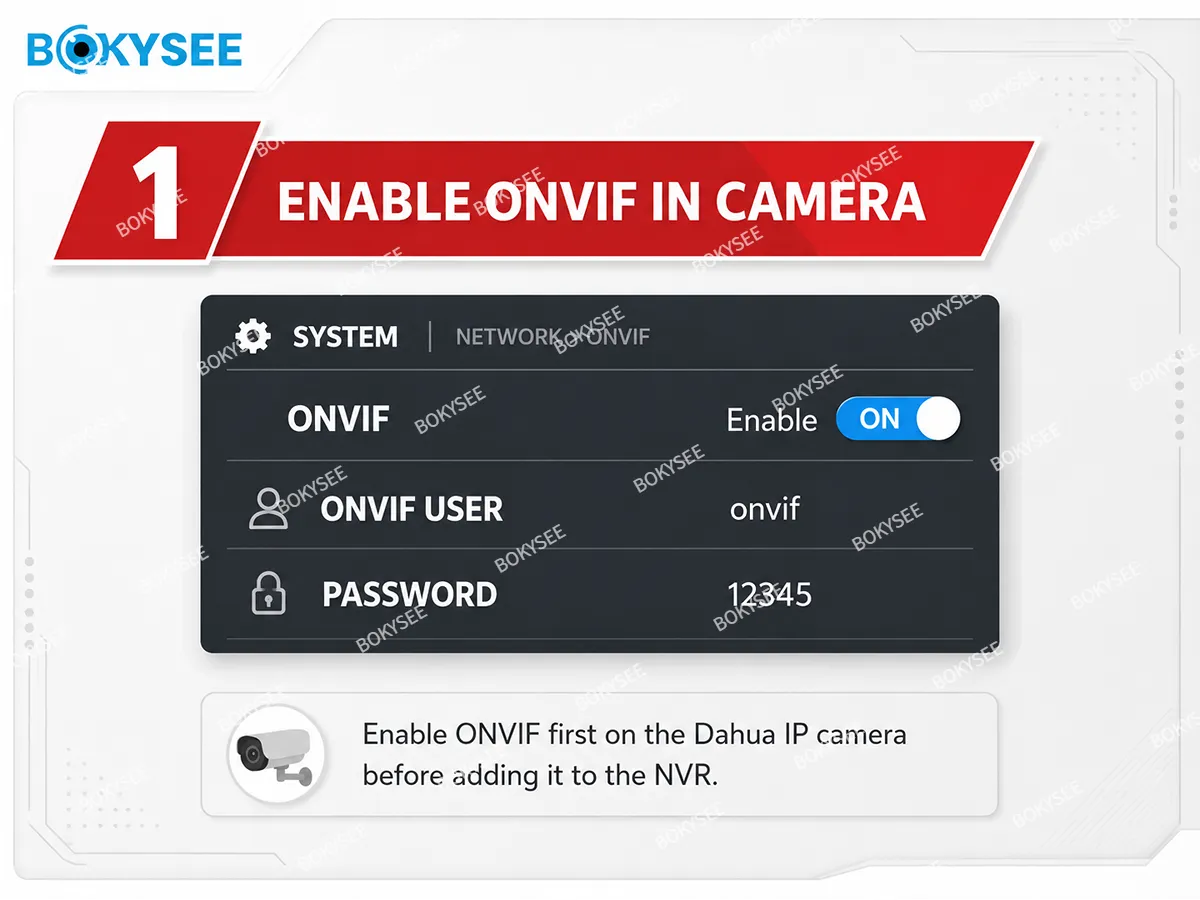
Log in to the Dahua camera web interface from a computer on the same network. Enter the Dahua camera IP address in the browser and log in with the camera admin account.
The menu name may vary by firmware version, but common paths include:
Setting > Network > Connection > ONVIF
or
Setup > System > Account > ONVIF User
Make sure ONVIF is enabled.
Some Dahua firmware versions require a separate ONVIF account. Dahua Wiki notes that users can set up an ONVIF account by selecting Add User, entering the username and password, selecting the ONVIF group association, and applying the settings.
Recommended ONVIF user example:
|
Field |
Recommended Setting |
|---|---|
|
Username |
onvif |
|
Password |
Strong password |
|
Group |
Administrator or Operator |
|
Status |
Enabled |
Avoid using very complicated special characters during first testing. Some older NVR or camera firmware may fail authentication when the password contains unsupported symbols.
[Image suggestion 3: Dahua camera web interface screenshot showing ONVIF enabled and ONVIF user created.]
Alt text: Enable ONVIF and create ONVIF user on Dahua IP camera.
Step 2: Confirm Dahua ONVIF Port and RTSP Port

After enabling ONVIF, check the camera port settings.
Common path:
Setting > Network > Port
Typical Dahua port settings:
|
Port Type |
Common Value |
|---|---|
|
HTTP port |
80 |
|
RTSP port |
554 |
|
HTTPS port |
443 |
|
TCP port |
37777 |
For Hikvision NVR manual adding, the ONVIF management port is usually the HTTP/ONVIF service port, often 80. The RTSP port is often 554, but it is normally not entered as the ONVIF management port.
This is a common mistake. If the NVR asks for “Management Port” and you enter 554 instead of 80, the camera may fail to connect.
Step 3: Set Dahua IP Camera and Hikvision NVR to the Same Network
There are two common connection methods.
Method 1: External PoE Switch Connection
This is the easiest method for third-party ONVIF camera integration.
Connect the Dahua camera, Hikvision NVR, and router to the same PoE switch or network switch.
Example:
|
Device |
IP Address |
|---|---|
|
Router |
192.168.1.1 |
|
Hikvision NVR |
192.168.1.64 |
|
Dahua IP Camera |
192.168.1.120 |
This method is recommended for installers because it avoids many built-in PoE port network issues.
Method 2: Hikvision NVR Built-in PoE Port
If the Dahua camera is connected directly to the Hikvision NVR PoE port, the NVR may use an internal PoE network, such as 192.168.254.X.
In this case, third-party cameras may not work with Plug-and-Play. You may need to:
-
Change the channel adding method from Plug-and-Play to Manual.
-
Set the Dahua camera IP address to the NVR PoE network range.
-
Use ONVIF protocol.
-
Enter the ONVIF username and password manually.
For third-party cameras, Manual Add is usually more reliable than Plug-and-Play.
[Image suggestion 4: Two connection diagrams: external PoE switch method and direct NVR PoE port method.]
Alt text: Two ways to connect Dahua IP camera to Hikvision NVR using ONVIF.
Step 4: Manually Add Dahua IP Camera to Hikvision NVR via ONVIF
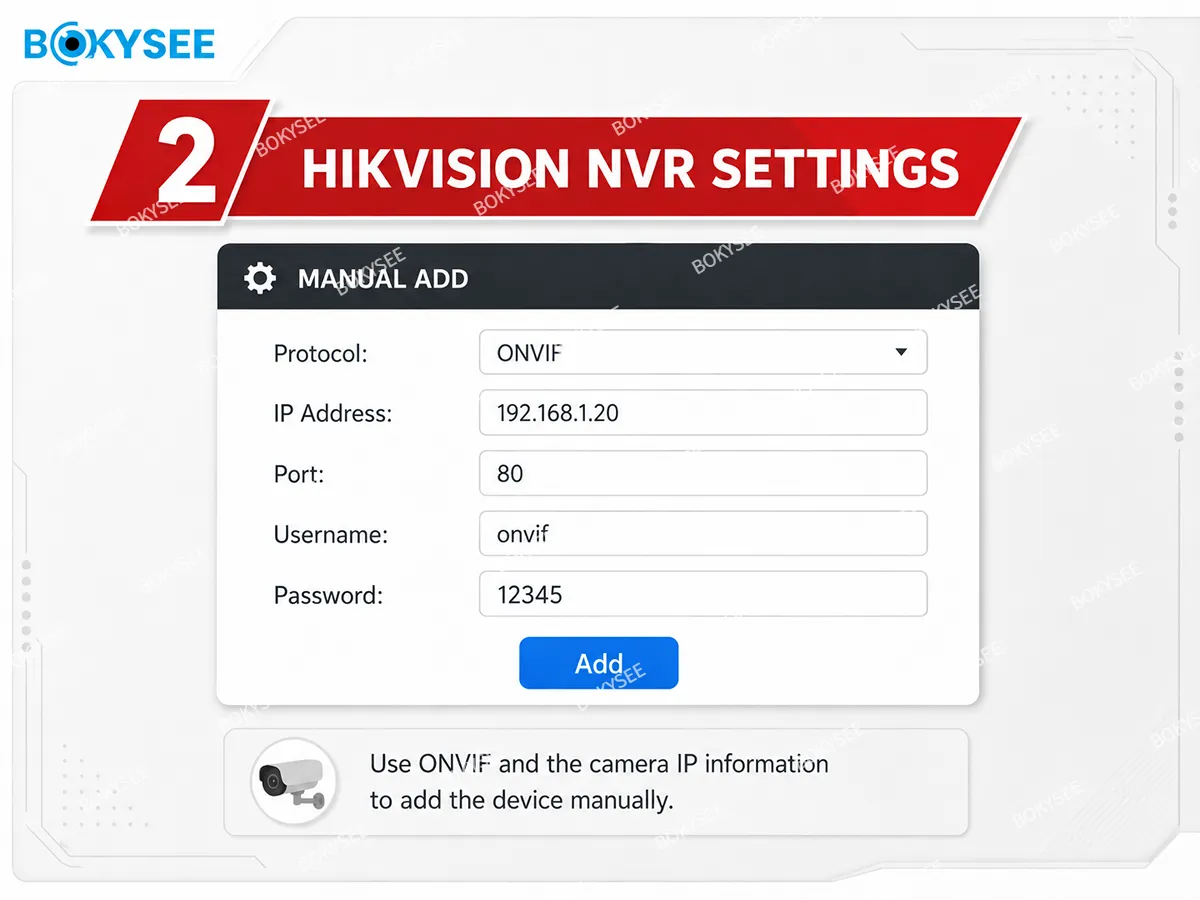
Now go to the Hikvision NVR.
Common local monitor path:
Menu > Camera > IP Camera > Custom Adding
Common web interface path:
Configuration > Camera Management > IP Camera > Add
Before adding the camera, make sure the IP camera is active. Hikvision’s NVR manual also notes that before adding a camera, the IP camera should be in active status.
Enter the camera information:
|
Setting |
Value |
|---|---|
|
Adding Method |
Manual |
|
Protocol |
ONVIF |
|
IP Address |
Dahua camera IP address |
|
Management Port |
Usually 80 |
|
Username |
Dahua ONVIF username |
|
Password |
Dahua ONVIF password |
|
Transfer Protocol |
Auto / TCP |
|
Channel |
Available NVR channel |
Click Add or OK.
Wait 30–60 seconds. If the information is correct, the camera status should turn Online.
[Image suggestion 5: Hikvision NVR manual add page with protocol ONVIF, IP address, port, username, and password fields.]
Alt text: Manually add Dahua IP camera to Hikvision NVR using ONVIF protocol.
Step 5: Verify Live View After Adding Dahua Camera to Hikvision NVR
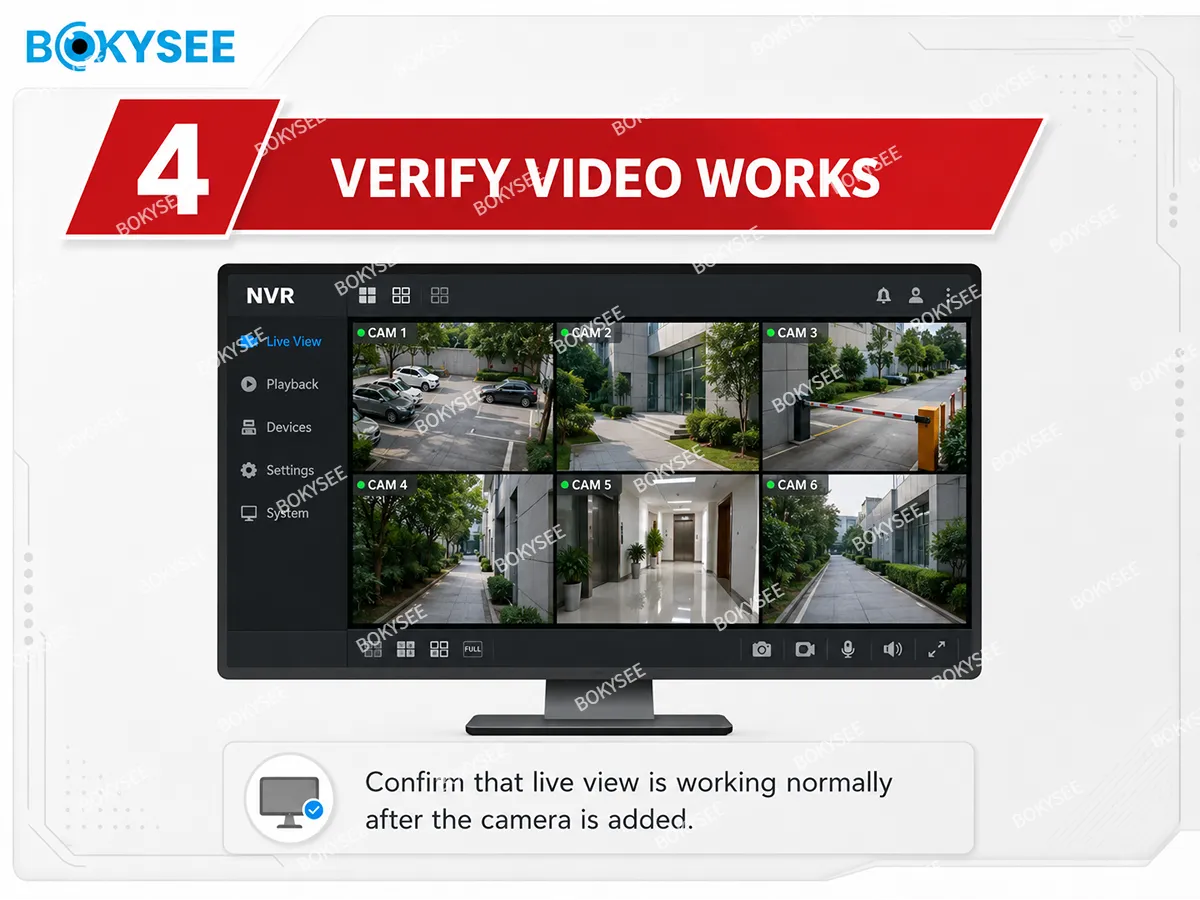
After the Dahua camera shows Online, open Live View on the Hikvision NVR.
If live video appears, the ONVIF connection is successful.
If the camera shows Online but there is no image, check the stream settings. Some NVRs may not support the current camera stream format, especially if the camera is set to high resolution, high bitrate, H.265, or a special encoding mode.
For first testing, use a more compatible stream:
|
Stream Setting |
Recommended Test Value |
|---|---|
|
Codec |
H.264 |
|
Resolution |
1080P / 4MP first |
|
Frame rate |
15–20 fps |
|
Bitrate |
Moderate |
|
Bitrate control |
CBR |
|
Smart codec |
Off during testing |
After video works, you can gradually increase the resolution or switch to H.265 if the NVR supports it.
[Image suggestion 6: NVR live view monitor showing multiple CCTV camera screens.]
Alt text: Verify Dahua ONVIF camera live view on Hikvision NVR.
Step 6: Enable Recording for ONVIF Camera on Hikvision NVR
Adding the camera does not always mean recording is enabled. You need to configure the recording schedule.
Common path:
Storage > Schedule Settings
or
Record > Schedule
Select the channel where the Dahua camera was added. Then choose the recording mode:
|
Recording Mode |
Recommendation |
|---|---|
|
Continuous recording |
Best for reliable project recording |
|
Motion recording |
Depends on ONVIF event support |
|
Event recording |
May be limited across brands |
|
Continuous + Motion |
Good for many commercial sites |
For cross-brand ONVIF cameras, continuous recording is usually the safest option. Motion detection may not always transfer correctly from Dahua camera to Hikvision NVR through ONVIF.
Also check:
-
HDD is installed.
-
HDD is initialized.
-
Recording schedule is active.
-
Time and date are correct.
-
Overwrite is enabled if required.
-
Playback works after a few minutes.
For installers working on larger CCTV projects, it is better to test both live view and playback before leaving the site.
[Image suggestion 7: Hikvision recording schedule page with continuous recording selected.]
Alt text: Enable recording schedule for Dahua ONVIF camera on Hikvision NVR.
Step 7: Fix Dahua Camera Offline on Hikvision NVR
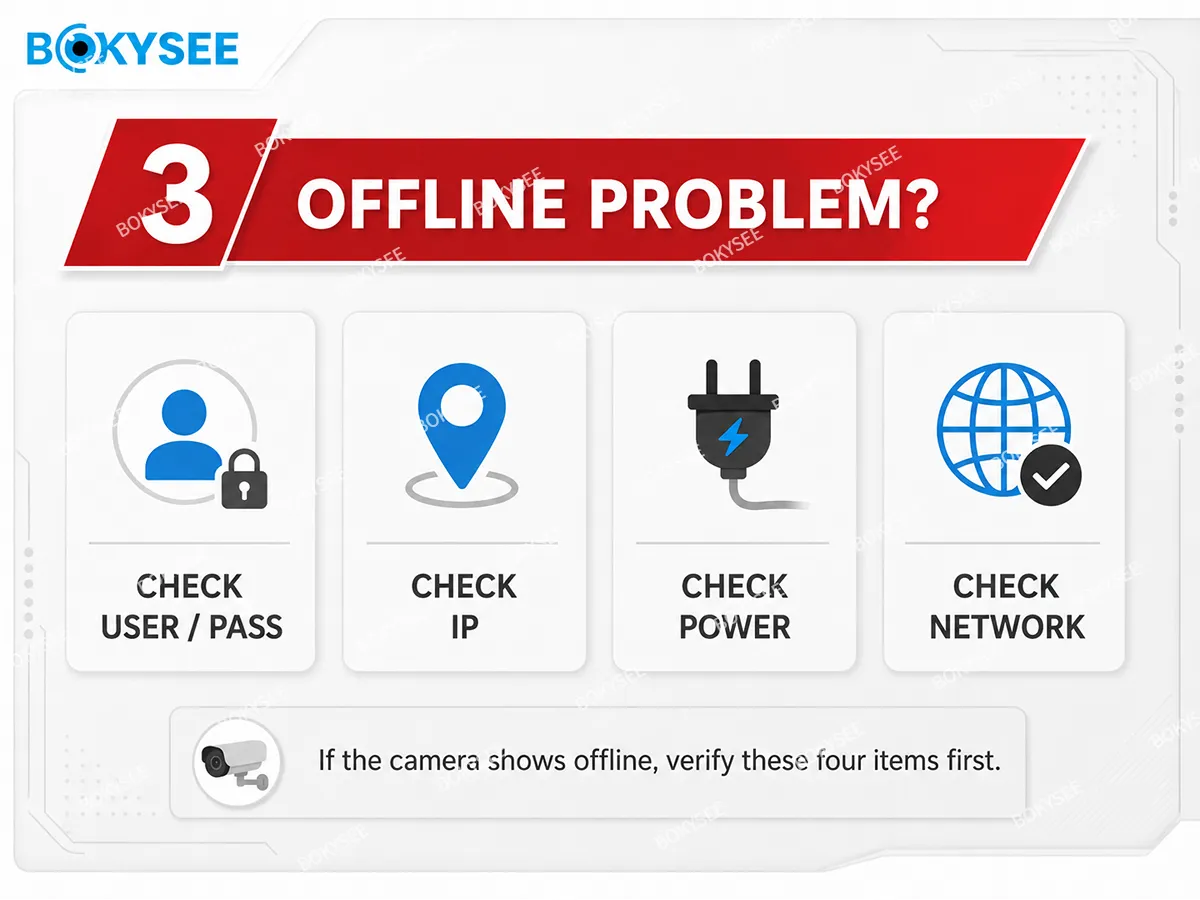
If the Dahua camera shows Offline on the Hikvision NVR, check the following problems one by one.
Wrong ONVIF Username or Password
This is the most common issue.
Do not assume the Dahua camera admin username is the same as the ONVIF username. Log in to the Dahua camera and create a dedicated ONVIF user.
Use this ONVIF account on the Hikvision NVR.
Wrong IP Address or Different Network Segment
Make sure the camera and NVR are in the same subnet.
Example of correct settings:
-
NVR:
192.168.1.64 -
Camera:
192.168.1.120 -
Gateway:
192.168.1.1 -
Subnet mask:
255.255.255.0
Example of incorrect settings:
-
NVR:
192.168.1.64 -
Camera:
192.168.254.10
Unless routing or internal PoE network configuration is correct, these two devices may not communicate.
Wrong Management Port
Try port 80 first if the Dahua camera HTTP/ONVIF port is 80.
Do not use RTSP port 554 as the ONVIF management port unless the camera or NVR specifically requires it.
ONVIF Not Enabled
Log in to the Dahua camera and confirm ONVIF is enabled.
Plug-and-Play Is Still Enabled
For third-party cameras, change the channel from Plug-and-Play to Manual Add.
Stream Not Supported
Lower the stream settings:
-
Change H.265 to H.264.
-
Reduce resolution.
-
Reduce bitrate.
-
Disable smart codec temporarily.
PoE Power Problem
If the camera frequently disconnects, reboots, or turns offline at night, check the PoE power budget.
PTZ cameras, motorized zoom cameras, full-color cameras, and cameras with strong IR LEDs may require more power than standard fixed cameras.
[Image suggestion 8: Troubleshooting graphic with icons: user/password, IP address, power, port, network.]
Alt text: Dahua camera offline troubleshooting on Hikvision NVR.
ONVIF Camera Compatibility Limits Between Dahua and Hikvision NVR
ONVIF is useful, but it is not the same as using one complete brand ecosystem.
Usually supported:
-
Live view
-
Basic recording
-
Main stream and sub stream
-
Basic PTZ control, if supported by both devices
-
Basic audio in some cases
May be limited:
-
AI human detection
-
Face recognition
-
Line crossing detection
-
Intrusion detection
-
Smart playback
-
Two-way audio
-
Advanced alarm linkage
-
NVR-side smart search
-
Camera firmware configuration from NVR
For project buyers, this is important. If the project only needs basic video and recording, ONVIF is usually enough. If the project requires full AI functions, smart event recording, or brand-specific analytics, it is better to test the exact camera and NVR model before bulk order.
For more general background, you can read Bokysee’s guide on what is an ONVIF IP camera and the ONVIF IP camera compatibility checklist.
Recommended Installer Checklist for ONVIF Camera Setup
Before finishing the installation, confirm:
|
Check Item |
Status |
|---|---|
|
Dahua camera is powered on |
Yes |
|
Camera and NVR are in same network |
Yes |
|
ONVIF is enabled |
Yes |
|
ONVIF user is created |
Yes |
|
Correct IP address is entered |
Yes |
|
Correct ONVIF port is entered |
Yes |
|
Protocol is set to ONVIF |
Yes |
|
Live view works |
Yes |
|
Recording schedule is enabled |
Yes |
|
Playback works |
Yes |
|
HDD status is normal |
Yes |
This simple checklist can reduce most connection failures in mixed-brand CCTV projects.
FAQ: Dahua IP Camera to Hikvision NVR via ONVIF
Can I add a Dahua IP camera to a Hikvision NVR?
Yes. In many cases, a Dahua IP camera can be added to a Hikvision NVR through ONVIF, as long as both devices support ONVIF and the network, port, username, and password are correct.
What protocol should I choose on Hikvision NVR?
Choose ONVIF when manually adding a Dahua IP camera or other third-party IP camera to a Hikvision NVR.
What port should I use for Dahua ONVIF camera?
In many cases, the ONVIF management port is the HTTP port, usually 80. RTSP is often 554, but it is normally used for video streaming, not the ONVIF management port.
Why does my Dahua camera show offline on Hikvision NVR?
Common reasons include wrong ONVIF username/password, wrong IP address, different network segment, wrong port, ONVIF disabled, Plug-and-Play mode, unsupported stream settings, or insufficient PoE power.
Can Hikvision NVR record Dahua camera video?
Yes, once the camera is successfully added through ONVIF, the Hikvision NVR can usually record video. However, you still need to enable the recording schedule and confirm playback.
Will Dahua AI detection work on Hikvision NVR?
Not always. Basic video and recording usually work, but AI functions and smart events are often brand-specific and may not transfer fully through ONVIF.
Conclusion: Add Dahua IP Camera to Hikvision NVR with ONVIF the Right Way
Adding a Dahua IP camera to a Hikvision NVR through ONVIF is a practical solution for mixed-brand CCTV systems. The key is to avoid relying only on automatic Plug-and-Play. Instead, use a clear manual process:
Enable ONVIF on the Dahua camera, create an ONVIF user, confirm the camera and NVR are on the same network, enter the correct IP address and port, manually add the camera to the Hikvision NVR, then enable recording and test playback.
For installers and project buyers, ONVIF offers useful flexibility. But for large CCTV projects, always test the exact camera model, NVR model, firmware version, stream settings, and recording performance before mass deployment.
Bokysee provides ONVIF-compatible IP camera solutions for installers, distributors, and project-based CCTV buyers. If you need help choosing IP cameras, NVRs, PoE systems, or a complete project quotation, Bokysee can support you with practical CCTV product recommendations and one-stop security camera solutions.