IP camera image flipping happens when the video looks upside-down. It can also appear mirrored. This problem is caused by wrong mounting, bad settings, or software bugs. Flipped images make it hard to see clearly. This can weaken security in important areas. Fixing this problem gives clear views and better security. The solution includes simple steps for hardware and software issues. Anyone can follow these steps easily.
Turn the Camera: The Easiest Fix
Check How the Camera is Mounted
Look at how the camera is set up.
Check the camera's position carefully. See if it is upside-down or tilted. Make sure the lens faces the right way for a clear view. Check if wind or bumps have moved the camera from its spot.
Move the camera to fix the image.
Adjust the camera to make it straight. Turn it by hand until the video looks normal. Tighten the camera after fixing it to stop it from moving. Use screws or brackets to keep it steady.
Follow Installation Rules
Read the manual for mounting tips.
Look at the manual that came with the camera. Follow the steps to mount it the right way. Check for details like the best height and angle. Manuals often have pictures to help you.
Make sure the camera stays in place.
Check if the camera is mounted tightly. Tighten any loose screws or brackets to stop it from moving. Use strong materials for outdoor cameras to handle weather. Check the mount often to keep it secure.
IP Camera Software Settings: Fixing the Image Direction
Using the Camera's Web Page
Open a browser and type the camera's IP address.
Use a computer or phone to open a browser. Type the camera's IP address in the search box. Find this address in the manual or settings app.
Go to settings and find the image direction option.
Log in with your username and password. Look for the settings on the main page. Find options like "Image Direction," "Flip," "Mirror," or "Rotate."
Pick the right direction (like flip or mirror).
Choose the setting to fix the image. Click "Apply" or "Save" to keep changes. Refresh the video to see if it's fixed.
Changing with Mobile App
Open the camera app on your phone.
Get the app from the camera's website or app store. Open it and log in with your details.
Find the image settings or direction menu.
Go to settings in the app. Look for image direction under video settings. Options might be "Flip," "Mirror," or "Rotate."
Make changes to fix the image.
Pick the right option to fix it. Save changes in the app. Check the video to see if it's right.
Use Install Mode
Learn about 'Install Mode' in your camera.
Some cameras have "Install Mode" to adjust images. It changes the image based on how the camera is set up. Check the manual to see if your camera has this.
Turn on the mode to auto-fix the image.
Use the web page or app to go to settings. Turn on "Install Mode" under image settings. Set the camera right and let the mode fix the image.
Firmware Update
Check if the camera's firmware is current.
Visit the camera maker's website to find the newest firmware. Compare the website's version with the one on your camera. Use the web page or app to check firmware details. Look for "Firmware Version" or "System Info" in settings.
Update firmware to fix software bugs causing flipped images.
Download the latest firmware from the maker's website. Follow the steps to save it on your computer or phone. Open the camera's settings using the web page or app. Go to "System Settings" or "Maintenance" to update firmware. Upload the file and start the update. Wait for the camera to finish and restart. Check the video to see if the flipping problem is gone.
Advanced Solutions for Specific IP Camera Models
Brand-Specific Settings
Hikvision cameras: Steps to fix flipped images
Hikvision cameras make fixing flipped images simple. Open a browser and type the camera's IP address. Log in with your username and password. Go to "Display Settings" and find "Image" options. Look for "Rotate," "Flip," or "Mirror" settings. Choose the correct option to fix the image. Save changes and refresh the video to check.
Dahua cameras: How to adjust flipped images
Dahua cameras have easy settings for image fixes. Enter the camera's IP address in a browser. Log in using your username and password. Find the "Video" or "Image" section in settings. Look for "Flip" or "Mirror" options. Pick the right setting to fix the image. Save changes and check the live video feed.
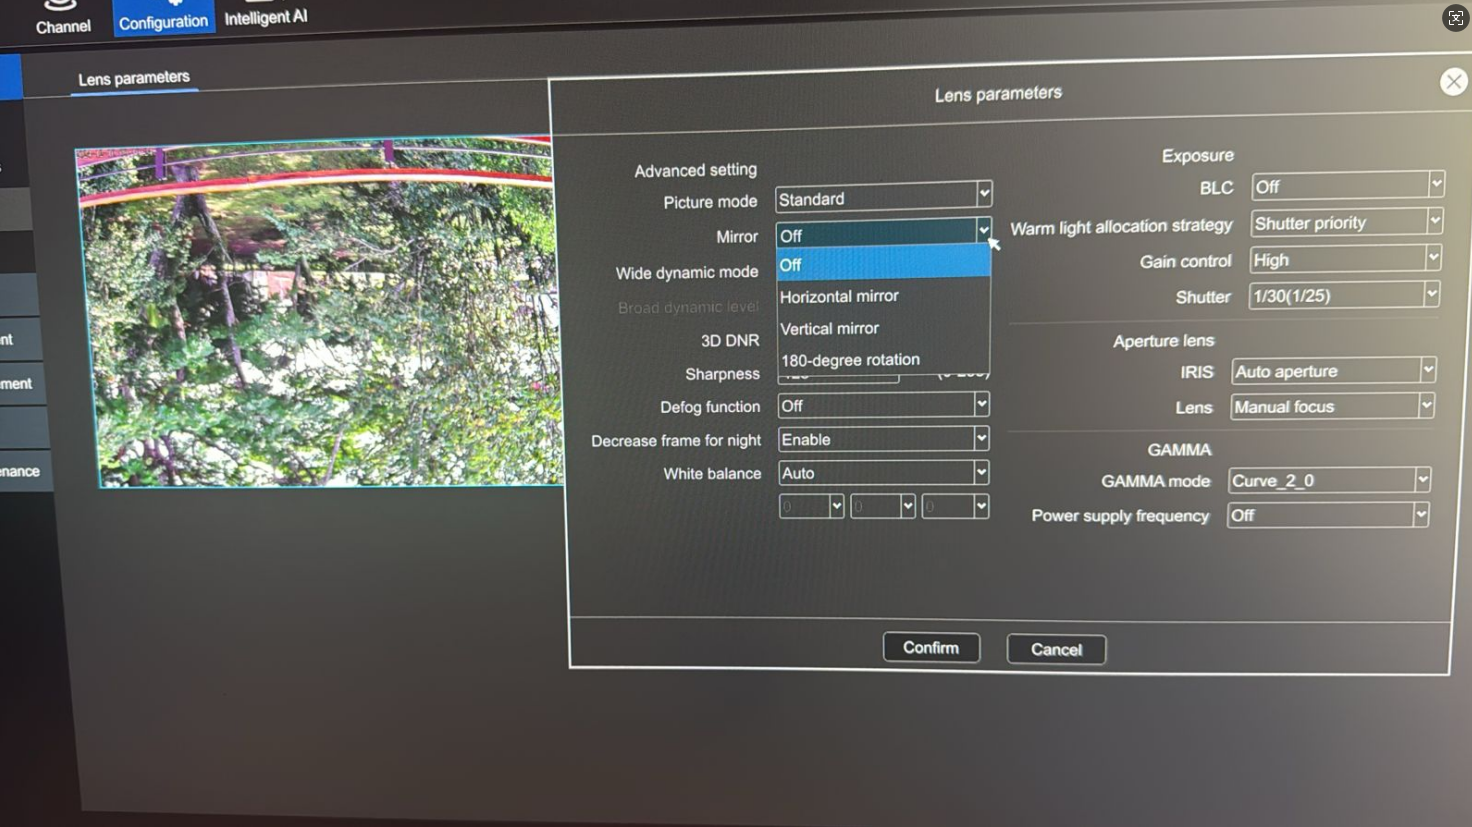
Bokysee cameras: Fixing images through NVR interface
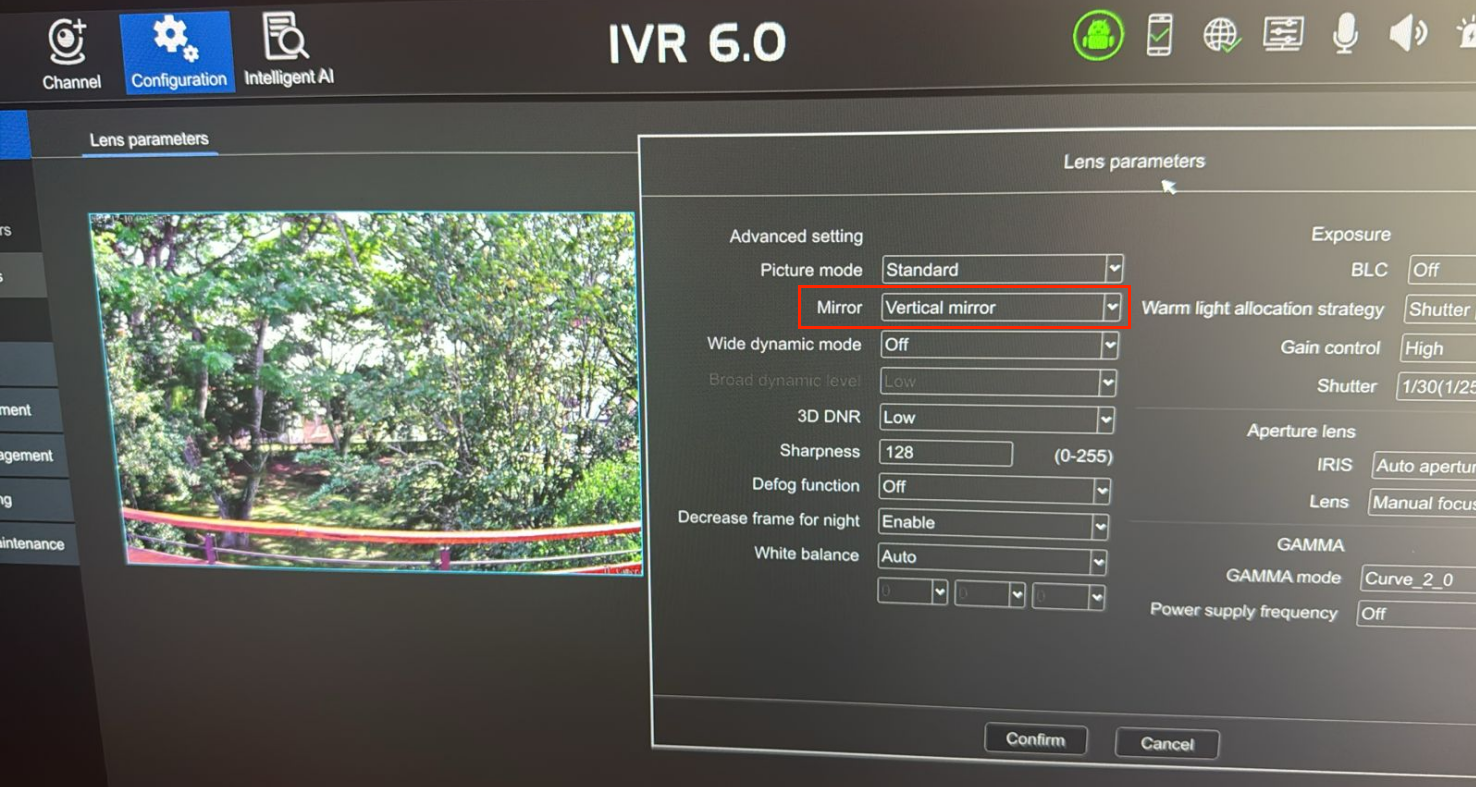
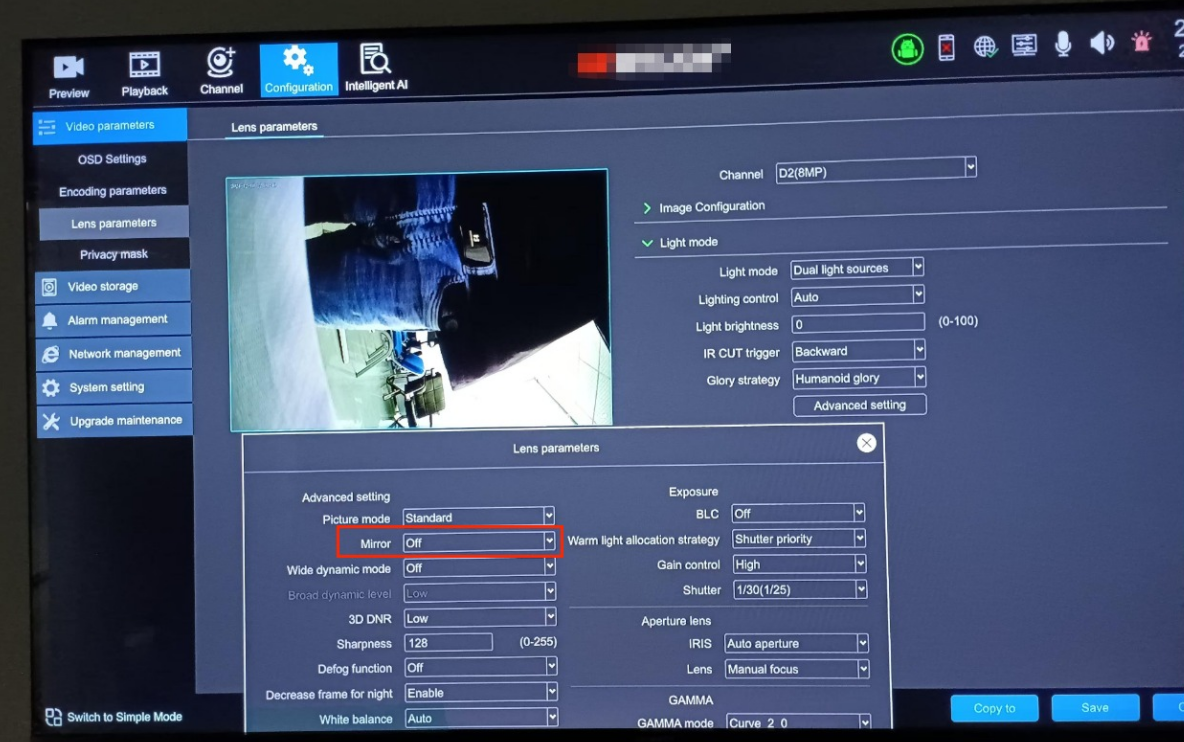
Bokysee cameras need adjustments via the NVR software. Open the NVR program on a connected device. Go to "Configuration". Select the camera with the flipped image. Find "Lens Parameters" options. Change the settings to fix the image. Save changes and check the camera preview.
Third-Party Software Tools
Use VMS to fix image problems
Video management software (VMS) helps fix image issues. Install a trusted VMS app that works with your camera. Add the camera by entering its IP address and login info. Open the camera settings in the VMS app. Find "Image Orientation" or "Video Adjustment" options. Adjust the image by flipping, mirroring, or rotating. Save changes and check the video feed.
Try open-source tools for custom fixes
Open-source tools allow unique image adjustments. Download a trusted open-source video tool. Install it on your computer or server. Add the camera using its IP address and login details. Go to "Image Settings" or "Video Configuration." Use options like rotate, mirror, or flip to fix the image. Save changes and test the video feed.
Troubleshooting Common Issues of IP Camera
Image Still Flipped After Adjustments
Check the camera's position and settings again.
Look at how the camera is mounted. Make sure it’s not upside-down or tilted. Tighten all screws and brackets to keep it steady. Open the camera’s app or web page. Find settings like "Flip," "Mirror," or "Rotate." Pick the right option and save changes. Refresh the video to see if it’s fixed.
Restart the camera to fix small problems.
Turn off the camera by unplugging it. Wait 10 seconds, then plug it back in. Let the camera restart completely. Check the video again to see if the image is correct. Restarting can solve small system errors.
Camera Not Responding to Settings Changes
Reset the camera to its original settings.
Find the reset button on the camera. Hold it for 10–30 seconds until it restarts. If there’s no button, use the app or web page. Go to "System Settings" and choose reset. Remember, this erases custom settings, so you’ll need to set it up again. Check the video feed to see if the problem is gone.
Get help from the camera maker.
Go to the manufacturer’s website for support. Look for their contact info like email, phone, or chat. Share the camera model and explain the issue clearly. Ask for help fixing it or about repairs. Brands like Hikvision often provide guides and updates to solve problems.
Preventing Future Image Flipping
Proper Installation Practices
Mount the camera securely and in the right position.
Secure mounting stops the camera from flipping images. Use strong screws or brackets to keep it steady. Avoid placing the camera upside-down or at odd angles. Follow the manual for the best height and angle. A solid setup keeps the video clear and stable.
Check the camera often for problems.
Regular checks help find issues early. Look for loose screws, broken mounts, or shifted lenses. Check the software settings for changes you didn’t make. Look at options like "Flip" or "Mirror" to ensure the image is correct. Routine checks keep the camera working well.
Regular Maintenance
Update firmware to fix software problems.
Firmware updates solve bugs that flip images. Go to the maker's website to find the newest version. Compare it with the firmware on your camera. Download and install updates by following the steps given. Updated firmware makes the camera work better.
Review settings often to catch unwanted changes.
Settings can change after power cuts or errors. Open the app or web page to check the settings. Make sure the image direction is correct. Adjust "Rotate" or "Mirror" if needed. Regular reviews keep the camera working properly.
Footer: Extra Help and Information
Ask for a Floorplan
Steps to get a floorplan for better camera placement.
A floorplan shows the best places for cameras. Contact the maker or a pro service to get one. Give exact measurements of the space for better advice. Share details like doors, hidden spots, and light levels. Use the floorplan to place cameras for full coverage and better use.
Request a Price Estimate
Talk to experts for setup or fixing services.
Experts can set up and fix cameras correctly. Contact trained technicians to get a price estimate. Tell them your camera type and the problem for a clear quote. Ask about setup, fixing, or regular check-up plans. Expert help saves time and avoids setup errors.
Help and Support
Contact the maker or provider for tech help.
Makers give direct help for camera problems. Go to their website to find contact info. Use email, phone, or chat to explain the issue. Share the camera type, serial number, and problem details. Ask for help with fixes, replacements, or updates. Many makers also have online guides like manuals and FAQs for quick answers.
Fixing IP camera image flipping is easy with simple steps. Move the camera to align it correctly. Use the software to fix the image direction. Update firmware to fix software bugs. Reset the camera if changes don’t work. Regular checks help avoid future issues.
Choose the steps that fit your problem. Call experts if the issue stays. Contact professionals like Bokysee at +86 17724292561.
See Also
Guide To Configuring Bokysee IP Camera Image Settings
Boosting Home Security Using POE Security Cameras
Launching Your Own CCTV Camera Business Successfully


