Skip to content
NVR systems are essential in contemporary security configurations, and the NVR battery is a key component that helps the system maintain its settings during power interruptions. Ensuring the NVR battery is in good condition is critical for the system's reliability. Regular inspections and timely replacements of the NVR battery can avert potential operational issues. Proper upkeep extends the lifespan of the NVR system. Users should prioritize the care of the NVR battery to guarantee uninterrupted and efficient security monitoring.
Understanding the NVR Button Battery
What is an NVR Button Battery?
Definition and purpose
An NVR Button Battery powers the internal clock of an NVR system. This battery ensures that the system retains settings during power outages. The NVR Battery plays a crucial role in maintaining accurate time and date information.
Common types and specifications
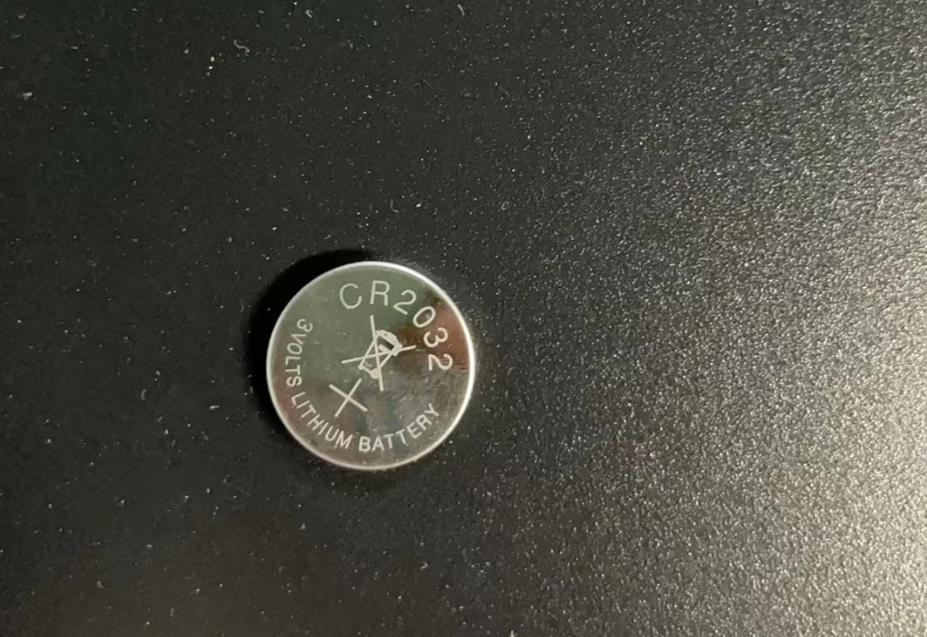
The most common type of NVR Battery is the CR2032 lithium button cell. This battery offers reliability and long life. Manufacturers recommend checking the specifications to ensure compatibility with the NVR model.
Why is it Important?
Role in maintaining system settings
The NVR Battery maintains essential system settings. This includes time, date, and configuration data. A functioning battery prevents loss of these settings during power interruptions.
Impact on NVR performance for NVR camera system
A reliable NVR Battery ensures optimal performance. The battery supports continuous operation without disruptions. Regular checks and timely replacements enhance the overall efficiency of the NVR system.
Why does my video recorder reset my date to the 1970s?
Common causes of date reset
Internal clock battery failure
The internal clock battery in an NVR system often fails. A failed battery cannot maintain the correct date and time settings. This failure results in the system defaulting to a past date, such as the 1970s. Regular battery checks prevent this issue. Replacing the battery at recommended intervals ensures proper function.
Firmware glitches
Firmware glitches also cause date resets. Software errors disrupt the system's ability to retain date settings. Regular firmware updates address these glitches. Manufacturers often release updates to fix known issues. Users should install updates promptly to maintain system reliability.
Impact of incorrect date setting
Data integrity issues
Incorrect date settings lead to data integrity issues. The system records footage under the wrong date and time. This mislabeling complicates data retrieval. Users find it difficult to locate specific events. Accurate date settings ensure reliable data storage and retrieval.
System synchronization problems
System synchronization problems arise from incorrect date settings. The NVR system fails to align with other network devices. This misalignment affects overall system performance. Proper date settings ensure seamless operation across all devices. Regular checks and updates maintain synchronization and efficiency.
Identifying the Right Network Video Recorder Buttom Battery
Compatibility with NVR Models
Selecting the correct NVR Battery is crucial for maintaining the system's functionality. Users must ensure compatibility between the battery and the NVR model. This step prevents potential damage and ensures optimal performance.
Checking manufacturer specifications
Manufacturers provide specific guidelines for compatible batteries. Users should consult these specifications before purchasing a replacement. For example, HIKVISION NVR recommends using the CR1220 lithium battery. This battery type is non-rechargeable and should be replaced with an identical one. Deviating from manufacturer recommendations may lead to system malfunctions.
Bokysee NVR compatibility
The Bokyses Video Recorder NVR models require careful consideration when selecting a battery. Users should verify compatibility through the manufacturer's website or user manual. Users can purchase suitable batteries from authorized dealers to ensure compliance.
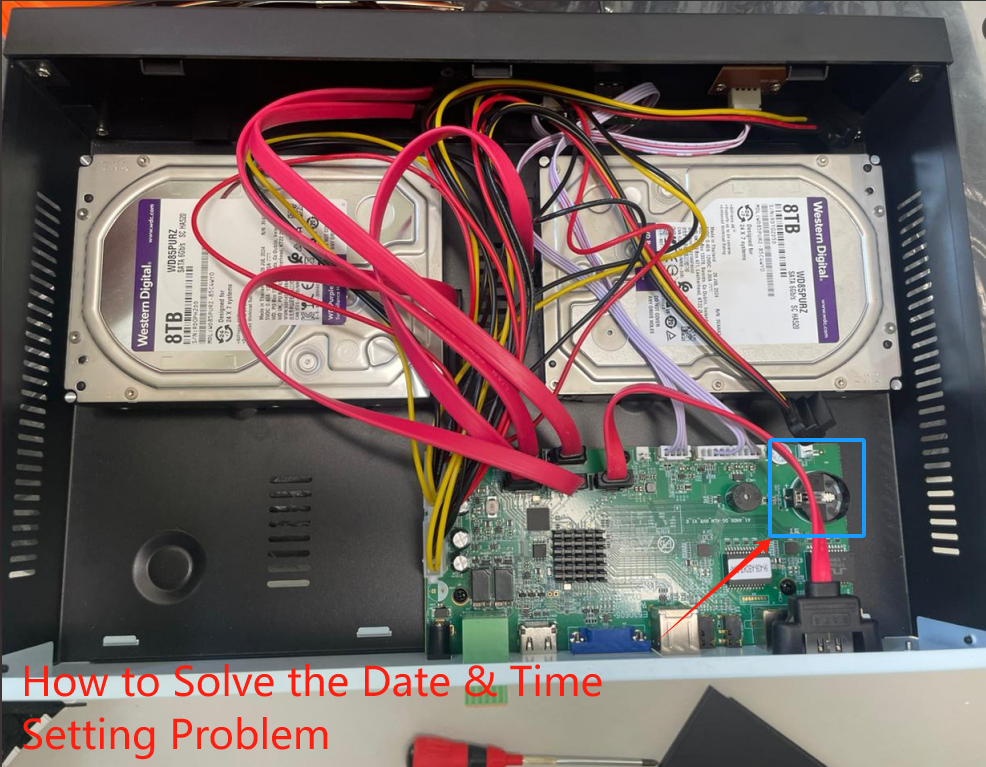
For transportation safety reasons, we may remove the button cell battery from the NVR as per customer request. If you receive the NVR without the battery installed, please remember to reinstall the button cell when setting up the hard drive. This is essential for the proper functioning of the NVR. You can inquiry us the size of battery cell. Usually, most of our NVRs are with CR2032, the 3V lithium battery,200-230mAh, Diameter is 20mm,thickness is 3.2mm.
How to Replace the NVR Button Battery
Replacing the NVR Battery involves several steps. Proper preparation ensures a smooth process.
Preparation Steps
Tools required
A few tools are necessary for replacing the NVR Battery. A small screwdriver helps in opening the battery compartment. A pair of tweezers assists in handling the battery. A new CR2032 lithium button cell serves as the replacement battery.
Safety precautions
Safety precautions are crucial during the replacement process. Power off the NVR before starting. Disconnect the NVR from the power source to prevent electrical hazards. Use anti-static gloves to avoid static discharge. Ensure proper grounding of the NVR to maintain safety.
Step-by-Step Replacement Guide
Accessing the battery compartment
Accessing the battery compartment requires careful attention. Locate the battery compartment on the NVR. Use the screwdriver to remove the screws securing the compartment cover. Gently lift the cover to expose the NVR Battery.
Removing the old battery
Removing the old battery involves precision. Use the tweezers to carefully lift the old NVR Battery from its slot. Avoid using excessive force to prevent damage to the compartment. Dispose of the old battery according to local regulations.
Installing the new battery
Installing the new battery completes the process. Place the new CR2032 lithium button cell into the battery slot. Ensure the correct orientation of the battery. Secure the compartment cover with screws. Reconnect the NVR to the power source and power it on to verify the replacement.
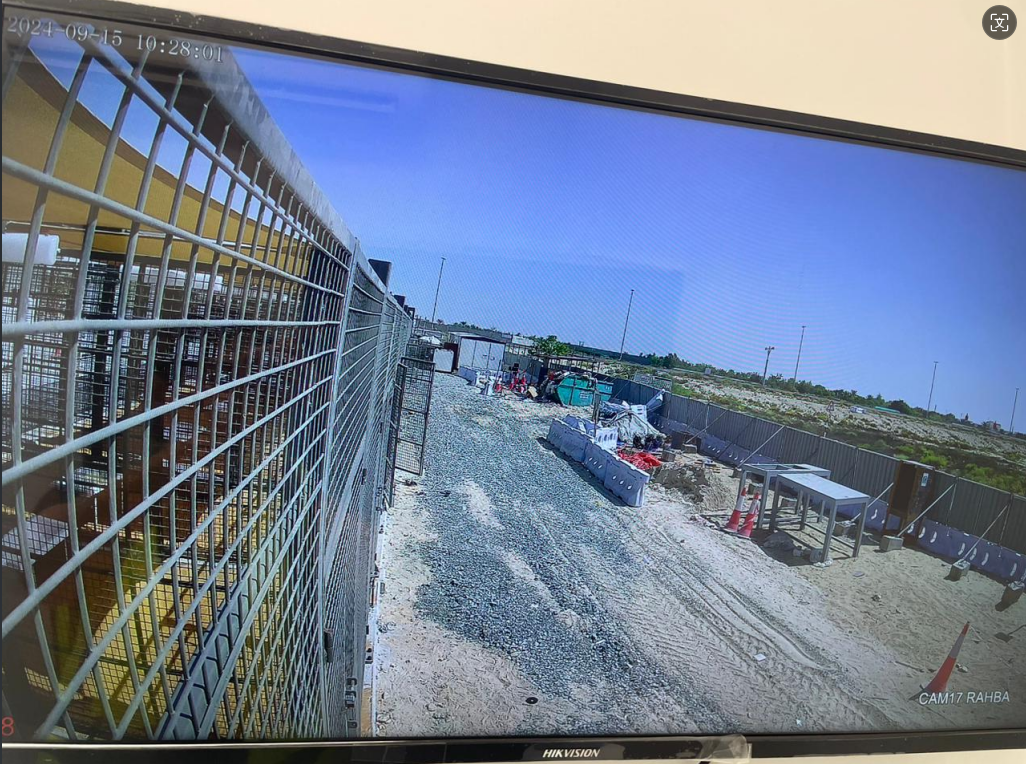
After you changed the Video Recorder NVR battery, then you can see the latest Date & Time for each video.
Maintaining Your NVR Button Battery
Regular Check-ups
Signs of a failing battery
A failing NVR Battery often shows specific signs. The system may reset frequently. Date and time settings might revert to defaults. Users should notice these changes promptly. A weak NVR Battery can disrupt system performance.
Scheduled maintenance tips
Regular maintenance ensures the longevity of the NVR Battery. Users should schedule checks every six months. Inspect the battery for corrosion or leaks. Replace the battery annually as recommended by manufacturers. Consistent maintenance prevents unexpected failures.
Extending Battery Life
Proper storage conditions
Proper storage conditions extend the life of an NVR Battery. Store spare batteries in a cool, dry place. Avoid exposure to direct sunlight. High temperatures reduce battery efficiency. Proper storage maintains optimal performance.
Avoiding common mistakes
Avoiding common mistakes helps preserve the NVR Battery. Do not mix old and new batteries. Use only manufacturer-recommended batteries. Incorrect battery types can damage the NVR. Follow guidelines to ensure safe and effective usage.
Understanding and maintaining the NVR button battery is essential for reliable security systems. Regular checks and timely replacements ensure optimal performance. Users should follow the outlined steps to prevent operational failures. Proper maintenance prolongs the life of the NVR system. Monitoring the battery level regularly guarantees uninterrupted surveillance coverage. Users can explore additional resources to deepen their knowledge. Continuous learning enhances the ability to manage security systems effectively.
See Also
Selecting the Ideal CCTV Maker for Home Protection
The Functioning of Solar-Powered Security Cameras
Essential Facts About Solar-Powered CCTV Cameras
Benefits of Opting for a 4G Solar-Powered Camera for Home Security