Skip to content
An IP camera system sends video using internet protocol. It has more features and is more flexible than Analog security systems. This modern system improves safety for homes and businesses. It gives clear video, remote viewing, and smart features. Good installation keeps video clear and works well. Using the right tools makes the installation process easier. It’s great for people who like DIY installation. Companies like Bokysee and Lorex offer cool options like network cameras and NVR setups. A proper camera system setup stops camera system playback issues. It also helps with video management for easy monitoring.
Getting Ready to Install an IP Camera System
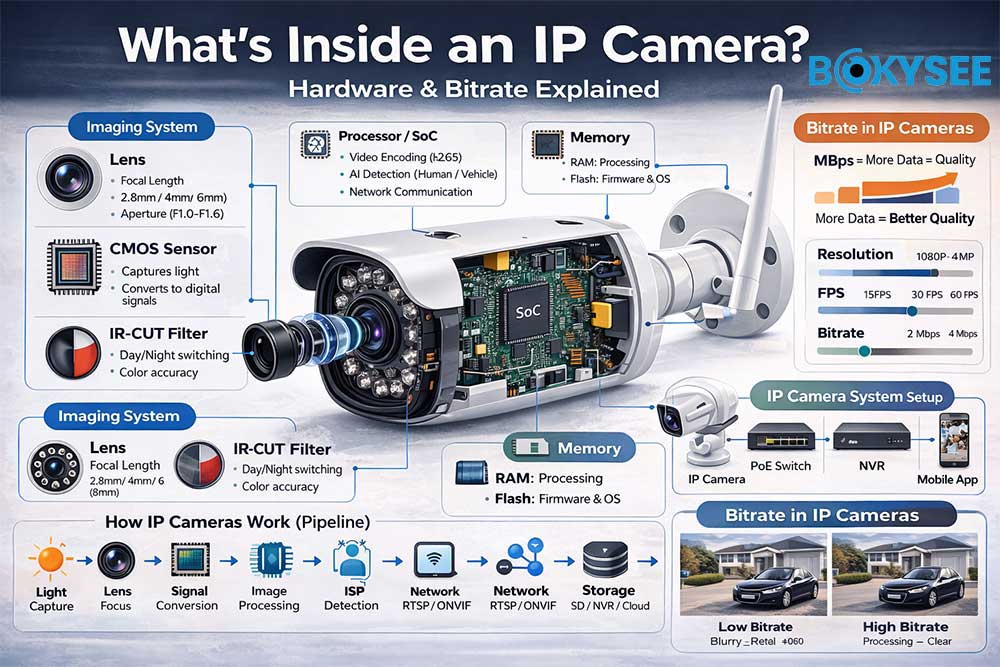
Knowing the Parts of an IP Camera System
Cameras and Their Types
Cameras are the heart of any IP camera system. Different cameras work for different places. Dome cameras are great indoors because they look neat. Bullet cameras are better outside with their long range. PTZ cameras can move and zoom for big spaces. Picking the right camera helps watch areas better.
Network Video Recorder (NVR) or Cloud Storage
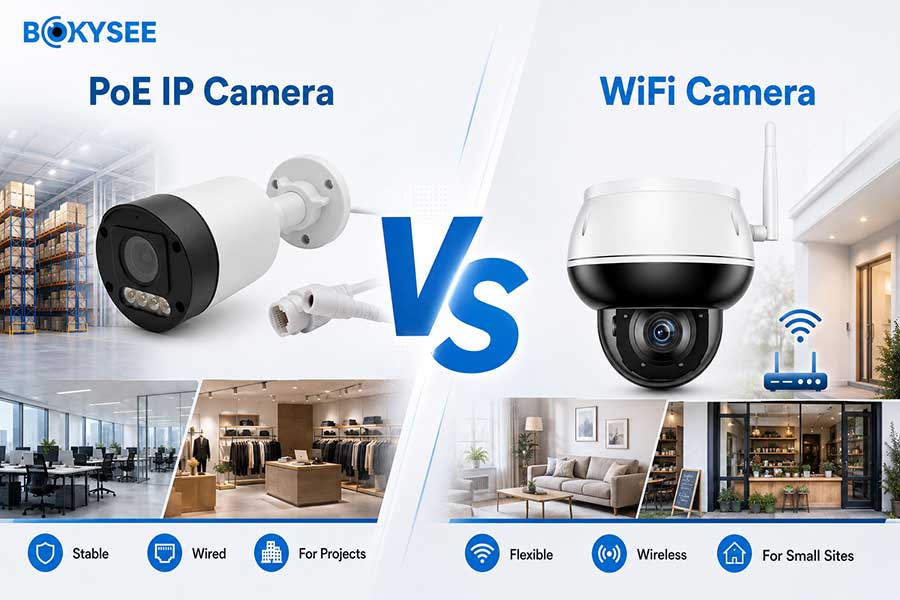
The NVR is like the system's brain. It stores videos and connects to cameras. PoE cameras use one cable for power and data, making setup easy. Wireless systems need a router to work. Cloud storage lets you see videos online but needs good internet. Keeping the NVR in good shape helps it work well.
Cables, Connectors, and Power Supplies
Cables and connectors keep everything connected. Ethernet cables link cameras to the NVR or router. Good connectors stop signal problems. Power supplies are needed unless you use PoE cameras. Neat cable setup avoids mess and keeps things working smoothly.
Picking the Best Spots for Your Camera System
Indoor vs. Outdoor Placement
Indoor cameras watch doors, halls, and rooms. Outdoor cameras guard driveways, yards, and fences. Weatherproof cameras handle bad weather. Where you put them depends on what you need to watch.
Coverage Area and Blind Spots
A good camera system diagram stops blind spots. Overlapping views make sure nothing is missed. Wide-angle lenses cover more space, so fewer cameras are needed. Testing spots helps find the best places.
Easy Maintenance Access
Easy-to-reach cameras are simpler to fix. Cameras too high are hard to clean or adjust. Putting them in reachable spots saves time for repairs. Regular checks keep them working for a long time.
Collecting Tools and Equipment You Need
Tools for Mounting and Wiring
You’ll need basic tools to mount cameras. A drill, screwdriver, and level help secure them. Wire cutters and crimping tools are useful for cables. A ladder might be needed for high spots.
Software or Apps for Setup
Setting up needs the right software or apps. Many brands have easy-to-use programs. The Bokysee app has features like motion alerts. Watching live video is easier with good software.
Using 'Bokysee' Products for Installation
Bokysee products make DIY installation simple. Their network cameras work well with Network Video Recorders. Features like night vision and motion detection add safety. Good tools and gear make setup faster and easier.
Step-by-Step Guide to Install an IP Camera System
Mounting the Cameras
Picking the Right Surface
Pick a strong surface for the camera. Walls or ceilings work well. Outdoor cameras need weatherproof spots to last longer. Flat surfaces keep cameras steady and secure.
Drilling and Attaching the Camera
Mark where to drill using the camera’s bracket. Drill holes for screws and anchors. Attach the camera tightly with screws to stop movement. A firm mount keeps the camera steady and reliable.
Setting the Camera Angle
Point the camera to cover the needed area. Adjust it to see clearly and avoid blind spots. Check the view on your device to make sure it’s right. A good angle helps the camera work better.
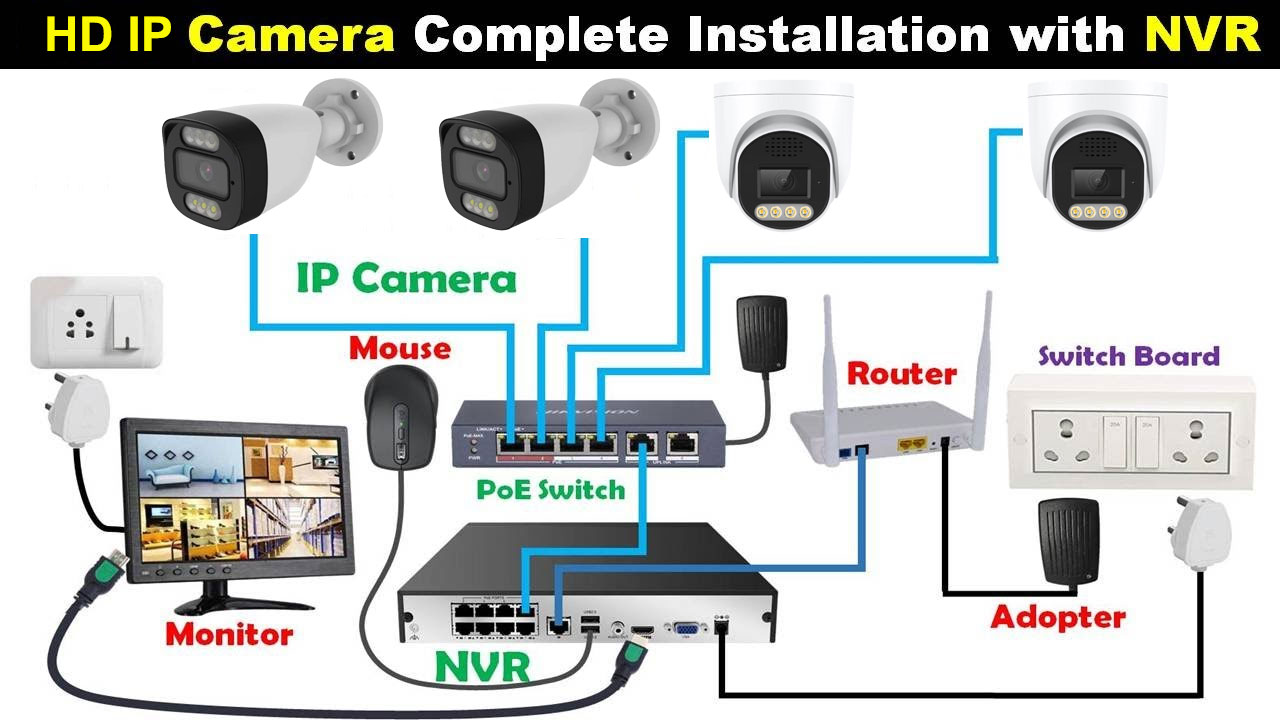
Connecting the Camera System
Linking Cameras to the NVR or Router
Use Ethernet cables to connect cameras to the NVR or router. Plug one end into the camera and the other into the NVR or router. For wireless cameras, connect them to Wi-Fi. A strong connection keeps the video smooth.
Powering the Cameras
Plug the camera’s power adapter into an outlet. PoE cameras use one cable for power and data. Make sure the power matches the camera’s needs. Good power keeps the camera running well.
Organizing the Cables
Keep cables neat to avoid tangles or damage. Use clips or ties to hold cables along walls or ceilings. Keep cables away from sharp edges or heat. Neat cables make the setup safe and tidy.
Setting Up the IP Camera System
Using the Camera App or Software
Download the app or software for your camera. Open it and log in to adjust settings. Follow steps to connect the camera to the network. Easy apps make setup simple.
Configuring the Network
Give each camera an IP address using the app. Turn on ONVIF to connect with other devices. Set up the NVR to find all cameras. A good network setup makes everything work smoothly.
Testing the Camera System
Watch the live feed on the app or monitor. Check if the NVR records without stopping. Adjust quality settings like resolution for clear video. Testing ensures the system is ready to use.
Integrating with Smart Devices
Connecting to smartphones or tablets
Get the right app for your IP camera system. Install it on your phone or tablet. Open the app and sign up if needed. Scan the QR code on the camera or NVR using the app. Make sure your phone or tablet is on the same Wi-Fi as the camera. Check the live video in the app to see if it works.
Setting up alerts and notifications
Turn on motion alerts in the app settings. Change the sensitivity to avoid alerts from small movements. Pick areas to watch closely by setting zones. Turn on push alerts to get updates on your phone or tablet. Test the alerts by moving in the watched area.
Using 'Bokysee' app for advanced features
Download the Bokysee app for more options. Use features like talking through the camera and night vision. Set recording times or record when motion is detected. Save videos to the cloud for safety. The app is easy to use and helps control the whole system.
Troubleshooting and Optimizing Your IP Camera System
Fixing Connection Issues
Checking network settings
Look at the network settings of your IP camera system. Make sure the LAN is working and steady. Check if the HTTP port is open for use. Confirm the NVR or router gives each camera a valid IP address. Use tools like CENTCOM for Windows to check the network camera status.
Fixing IP conflicts
Find and fix IP address problems in the LAN setup. Give each camera in the PoE camera system its own IP address. Avoid using common IP ranges that may clash with other devices. Update the DDNS settings to stop future issues. Restart the recording system after changing the IP setup.
Testing cables and connections
Check Ethernet cables for breaks or loose ends. Test cables connecting PoE security cameras to the NVR or router. Replace broken cables to fix the connection. Look at the ports on the router or switch to ensure they work. Use a cable tester to check the signal strength in the LAN.
Enhancing Video Quality
Changing camera settings
Open the camera's software to change resolution and frame rate. Adjust brightness or contrast to see better. Turn on features like Fusion technology for clearer video. Use Hanwha cameras for sharp, high-quality footage. Set up the camera for both day and night views.
Cleaning the camera lens
Wipe the lens of the Wi-Fi Cameras often to remove dirt. Use a soft microfiber cloth and lens cleaner to avoid damage. Be careful not to scratch the lens while cleaning. Check outdoor cameras for dirt from rain or wind. A clean lens gives clear video all the time.
Updating firmware or software
Download firmware updates for the ip camera system from the maker's site. Install the newest CENTCOM for Windows for better performance. Update Lorex products to unlock new features. Upgrade Fusion NVR for better smart device compatibility. Make sure the Video Management software supports the latest updates.
Solving Power Problems
Checking power connections
Inspect the power adapters of all cameras to ensure they work. Check if the PoE security cameras get power through Ethernet cables. Look at outlets and plugs for any issues. Use a voltage tester to confirm steady power. Make sure the installation meets the camera's power needs.
Adding backup power options
Set up a UPS to keep power during outages. Use solar-powered systems for outdoor cameras. Add backup batteries to keep cameras running in blackouts. Choose Lorex security systems with built-in power backups. Keep the system reliable with extra power sources.
Replacing broken parts
Change damaged power adapters or connectors right away. Replace bad Ethernet cables in the LAN setup. Switch to Bokysee cameras for strong and lasting parts. Use certified gear from the Bokysee Collection for better fit. Fix worn-out parts quickly to keep the camera system working well.
Maintenance and Best Practices for Your Camera System
Regular System Checks
Checking for damage
Look at cameras, cables, and connectors for any damage. Check for cracks on cameras or loose wires. Replace broken parts quickly to avoid problems. Make sure outdoor cameras stay weatherproof by inspecting seals. Regular checks keep your system working well.
Testing if cameras work
View live feeds from each camera using the app or software. Make sure cameras show clear images during day and night. Test motion detection to see if alerts work properly. Check if the system records video without stopping. Testing ensures everything works as it should.
Updating software and firmware
Go to the maker’s website to get the latest updates. Update camera software to improve security and performance. Install NVR updates to fix bugs and add features. Check for updates often to keep the system up-to-date. Updates make the system safer and better.
Improving Security of Your IP Camera System
Changing passwords
Open camera settings to replace default passwords with strong ones. Use a mix of letters, numbers, and symbols. Avoid easy passwords like "12345" or "password." Change passwords often to lower security risks. Strong passwords keep your system safe from hackers.
Turning on encryption
Enable encryption in the camera’s settings to protect video streams. Use WPA2 or WPA3 for wireless cameras to secure the network. Turn on HTTPS for safer web access to the system. Encryption keeps your data safe from hackers. Secure data stops unwanted access.
Watching system logs
Check system logs often to spot unusual activity. Look for repeated login attempts or unknown devices. Investigate anything strange right away to fix issues. Use tools from the maker to track activity easily. Watching logs helps keep your system secure.
Expanding Your Camera System
Adding more cameras
Find areas that need better coverage for new cameras. Pick cameras that work well with your current system. Follow steps to install and connect the new cameras. Test them to make sure they work properly. Adding cameras improves security in more places.
Increasing storage space
Check how much storage your system is using now. Add bigger hard drives or external storage for more space. Adjust resolution or frame rates to save storage. More storage means you won’t lose important videos. Good storage helps manage videos for a long time.
Connecting to smart devices
Link your camera system to smart hubs like Alexa or Google Home. Use voice commands or apps to control cameras. Pair cameras with smart lights or alarms for extra security. Test the setup to make sure everything works smoothly. Smart devices make your system easier to use.
Video Management and Recording System Setup
Picking the Right Video Management Software
Important Features in VMS
Choose software that is easy to use. Look for live viewing, playback, and motion alerts. Make sure it supports clear, high-quality video. Pick software that lets you set recording times. Ensure it keeps stored videos safe with secure access.
Working with 'Bokysee' Products
Check if the software works well with Bokysee cameras. It should support night vision and motion alert features. Confirm it connects to Bokysee's cloud storage. Choose software that improves how Bokysee products work.
Setting Recording Times
Go to the settings to pick recording times. Use continuous recording for important areas. Turn on motion recording to save space. Match recording times to daily activities. Test to make sure recordings start correctly.
Setting Up Network Video Recorders (NVR)
Connecting NVR to the Internet
Connect the NVR to the router with an Ethernet cable. Make sure the connection is stable and fast. Give the NVR a fixed IP address for better performance. Use a strong network for smooth video streaming. Test by logging into the NVR system.
Enabling Remote Viewing with WAN
Turn on WAN access in the NVR settings. Set up port forwarding on the router for outside access. Use a strong password to keep the system safe. Test remote access from another location. Check if the live video works without problems.
Testing Recording and Playback
Play recorded videos to check for smooth playback. Make sure the NVR saves videos without skipping. Try different playback speeds to see if they work. Check if recording happens during live viewing. Confirm the NVR keeps videos for the right amount of time.
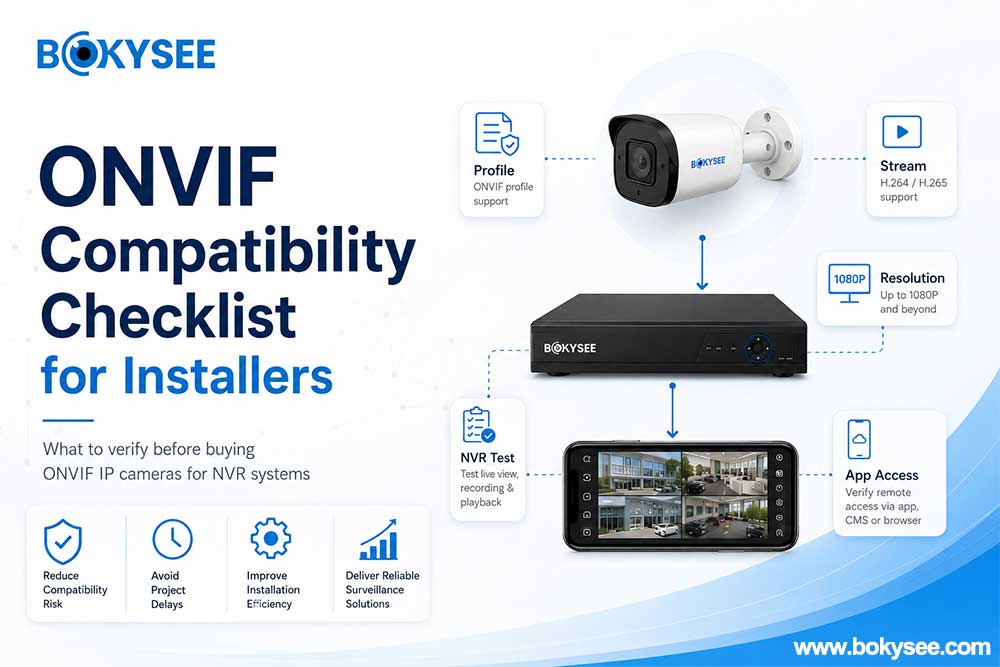
Using ONVIF for Device Integration
What is ONVIF Compatibility?
ONVIF helps devices from different brands work together. Make sure your camera and NVR support ONVIF. Use it to add more cameras to your system. Check if the ONVIF version matches your setup.
Setting Up ONVIF Mode
Turn on ONVIF in the camera’s settings. Add the camera to the NVR using ONVIF details. Give each camera a unique name for easy tracking. Test to see if the camera streams through ONVIF.
Fixing ONVIF Problems
Check the network for issues with ONVIF devices. Update the camera and NVR firmware to fix problems. Make sure the ONVIF profile fits your system. Restart devices if they don’t connect. Replace broken parts if nothing else works.
Setting up and taking care of an IP camera system is important. A good plan makes the system work well and last long. Using Bokysee products gives cool options like PoE cameras and smart WiFi tools. These make installing easier and improve safety. Begin building a strong camera system now. Each step brings more confidence in creating a safer place.
See Also
Boost Your Home Security Using POE Surveillance Cameras
Launching Your Own CCTV Camera Business: A Guide
Understanding Onvif IP Cameras in Security Solutions
Key Differences Between IP Camera Systems and Traditional Cameras